15 KiB
Omi Docs
My First Element
import { WeElement, define, render } from 'omi'

define('my-first-element', class extends WeElement {
  render() {
    return (
      <h1>Hello, world!</h1>
    )
  }
})

render(<my-first-element></my-first-element>, 'body')
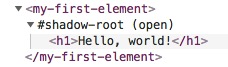
Look at the rendering structure in the HTML developer tool:
You can also use my-first-element in any other custom element. Such as:
import { WeElement, define, render } from 'omi'
import './my-first-element'

define('other-element', class extends WeElement {
  render() {
    return (
      <div>
        <my-first-element></my-first-element>
      </div>
    )
  }
})
Props
import { WeElement, define, render } from 'omi'

define('my-first-element', class extends WeElement {
  render(props) {
    return (
      <h1>Hello, {props.name}!</h1>
    )
  }
})

render(<my-first-element name="world"></my-first-element>, 'body')
You can also transmit any type of data to props:
import { WeElement, define, render } from 'omi'

define('my-first-element', class extends WeElement {
  render(props) {
    return (
      <h1>Hello, {props.myObj.name}!</h1>
    )
  }
})

render(<my-first-element myObj={{ name: 'world' }}></my-first-element>, 'body')
You can set default values for props in the following way:
import { WeElement, define, render } from 'omi'

define('my-first-element', class extends WeElement {
  static defaultProps = {
		name: 'Omi',
		myAge: 18
	}

  render(props) {
    return (
      <h1>Hello, {props.name}! Age {props.myAge}</h1>
    )
  }
})

render(<my-first-element name="world"></my-first-element>, 'body')
Through props, you can pass style or class to the root node, for example:
<el-button onClick={this.onClick} style="color:red;">默认按钮1</el-button>
<el-button type="primary" style={{color:'red'}}>主要按钮</el-button>
Event
define('my-first-element', class extends WeElement {
  onClick = (evt) => {
    alert('Hello Omi!')
  }

  render() {
    return (
      <h1 onClick={this.onClick}>Hello, world!</h1>
    )
  }
})
Custom Event
define('my-first-element', class extends WeElement {
  onClick = (evt) => {
    this.fire('myevent', { name: 'abc' })
  }

  render(props) {
    return (
      <h1 onClick={this.onClick}>Hello, world!</h1>
    )
  }
})
Bind event on the element:
<my-first-element onMyEvent={(evt) => { alert(evt.detail.name) }}></my-first-element>
Trigger custom event by this.fire and get the data by evt.detail.
CSS
define('my-first-element', class extends WeElement {
  static css = `h1 { color: red; }`

  render(props) {
    return (
      <h1>Hello, world!</h1>
    )
  }
})

render(<my-first-element onMyEvent={(evt) => { alert(evt.detail.name) }}></my-first-element>, 'body')
You can also write CSS, less and sass separately to another file using to-string-loader of webpack:
{
  test: /[\\|\/]_[\S]*\.scss$/,
  use: [
      'to-string-loader',
      'css-loader',
      'sass-loader'
  ]
}
Then:
import { define, WeElement } from 'omi'
import css from '../style/_button.scss'

define('el-button', class extends WeElement {
    static css = css
    ...
    ...
or:
static css = require('../style/_button.scss')
Lifecycle
| Lifecycle method | When it gets called |
|---|---|
install |
before the component gets mounted to the DOM |
installed |
after the component gets mounted to the DOM |
uninstall |
prior to removal from the DOM |
beforeUpdate |
before update |
updated |
after update |
beforeRender |
before render() |
receiveProps |
parent element re-render will trigger it |
For example:
import { render, WeElement, define } from 'omi'

define('my-timer', class extends WeElement {
  static observe = true

  data = {
    seconds: 0
  }

  tick() {
    this.data.seconds++
  }

  install() {
    this.interval = setInterval(() => this.tick(), 1000)
  }

  uninstall() {
    clearInterval(this.interval)
  }

  render() {
    return <div>Seconds: {this.data.seconds}</div>
  }
})

render(<my-timer />, 'body')
Ref
define('my-first-element', class extends WeElement {
  onClick = (evt) => {
    console.log(this.h1)
  }

  render(props) {
    return (
      <div>
        <h1 ref={e => { this.h1 = e }} onClick={this.onClick}>Hello, world!</h1>
      </div>
    )
  }
})

render(<my-first-element></my-first-element>, 'body')
Add ref={e => { this.anyNameYouWant = e }} to attrs of the element, then you can get it by this.anyNameYouWant.
You can also use createRef:
import { define, WeElement, createRef } from 'omi'

define('my-first-element', class extends WeElement {
  onClick = (evt) => {
    console.log(this.myRef.current)  //h1
  }

  myRef = createRef()

  render(props) {
    return (
      <div>
        <h1 ref={this.myRef} onClick={this.onClick}>Hello, world!</h1>
      </div>
    )
  }
})

render(<my-first-element></my-first-element>, 'body')
extractClass
import { classNames, extractClass } from 'omi'

define('my-element', class extends WeElement {
  render(props) {
    //extractClass will take out this class/className from props and merge the other classNames to obj
    const cls = extractClass(props, 'o-my-class', {
      'other-class': true,
      'other-class-b': this.xxx === 1
    })

    return (
      <div {...cls} {...props}>
        Test
      </div>
    )
  }
})
The classNames is the same as classnames of npm.
Store
Store is Omi's built-in centralized data warehouse, which solves and provides the following problems and capabilities:
- Component Tree Data Sharing
- Data Change Updates Dependent Components on Demand

Unlike global variables, when there are multiple root nodes, multiple stores can be injected.
define('my-first-element', class extends WeElement {
  //You must declare use here for view updating
  static use = [
    { myName: 'name' }
  ]

  onClick = () => {
    //auto update the view
    this.store.data.name = 'abc'
  }

  render() {
    return (
      <h1 onClick={this.onClick}>Hello, {this.use.myName}!</h1>
    )
  }
})

const store = {
  data: { name: 'Omi' }
}
render(<my-first-element name="world"></my-first-element>, 'body', store)
Exemplify the Path hit rule:
| proxy path | use path | Update |
|---|---|---|
| abc | abc | true |
| abc[1] | abc | true |
| abc.a | abc | true |
| abc | abc.a | false |
| abc | abc[1] | false |
| abc | abc[1].c | false |
| abc.b | abc.b | true |
If you hit one condition above, you can update it.
Summary is as long as updatePath or updatePath sub nodes are updated.
Slot
The HTML <slot> element—part of the Web Components technology suite—is a placeholder inside a web component that you can fill with your own markup, which lets you create separate DOM trees and present them together.
define('hello-element', class extends WeElement {
  render() {
    return (
      <div onClick={this.onClick}>
        <p><slot name="my-text">My default text</slot></p>
      </div>
    )
  }
})

define('my-app', class extends WeElement {
  render() {
    return (
      <div >
        <hello-element>
          <span slot="my-text">Let's have some different text!</span>
        </hello-element>
      </div>
    )
  }
})

render(<my-app></my-app>, 'body')
noSlot
For writing omi plugins, noSlot is very useful. He will not insert redundant DOM into HTML and you can get the vdom in the plugin by props.children.
import { define, render, WeElement } from 'omi'

define('fancy-tabs', class extends WeElement {
  static noSlot = true

  render() {
    return [
      <div id="tabs">
        <slot id="tabsSlot" name="title" />
      </div>,
      <div id="panels">
        <slot id="panelsSlot" />
      </div>,
      <div>Show me only when noSlot is true!</div>
    ]
  }
})

define('my-app', class extends WeElement {
  render() {
    return (
      <div>
        <fancy-tabs>
          <button slot="title">Title</button>
          <button slot="title" selected>
            Title 2
          </button>
          <button slot="title">Title 3</button>
          <section>content panel 1</section>
          <section>content panel 2</section>
          <section>content panel 3</section>
        </fancy-tabs>
      </div>
    )
  }
})

render(<my-app />, 'body')
Observe
Omi Observe
You can also use observe to create response views for element who no need store, such as:
define("my-app", class extends WeElement {
  static observe = true

  install() {
    this.data.name = "omi"
  }

  onClick = () => {
    this.data.name = "Omi V4.0"
  }

  render(props, data) {
    return (
      <div onClick={this.onClick}>
        <h1>Welcome to {data.name}</h1>
      </div>
    )
  }
})
MergeUpdate
If observe and mergeUpdate is used, the view does not change immediately after the data changes.
define('todo-list', class extends WeElement {
  static observe = true

  static mergeUpdate = true

  ....
})
If you want to get the real changed dom, you can use tick or nextTick.
import { render, WeElement, define, tick, nextTick } from 'omi'

define('todo-list', class extends WeElement {
  render(props) {
    return (
      <ul>
        {props.items.map(item => (
          <li key={item.id}>{item.text}</li>
        ))}
      </ul>
    )
  }
})

define('todo-app', class extends WeElement {
  static observe = true

  static get data() {
    return { items: [], text: '' }
  }
  install() {
    tick(() => {
      console.log('tick')
    })

    tick(() => {
      console.log('tick2')
    })
  }

  beforeRender() {
    nextTick(() => {
      console.log('nextTick')
    })

    // don't using tick in beforeRender or beforeUpdate or render or afterUpdate
    // tick(() => {
    //   console.log(Math.random())
    // })
  }

  installed() {
    console.log('installed')
  }

  render() {
    console.log('render')
    return (
      <div>
        <h3>TODO</h3>
        <todo-list items={this.data.items} />
        <form onSubmit={this.handleSubmit}>
          <input
            id="new-todo"
            onChange={this.handleChange}
            value={this.data.text}
          />
          <button>Add #{this.data.items.length + 1}</button>
        </form>
      </div>
    )
  }

  handleChange = e => {
    this.data.text = e.target.value
  }

  handleSubmit = e => {
    e.preventDefault()
    if (!this.data.text.trim().length) {
      return
    }
    this.data.items.push({
      text: this.data.text,
      id: Date.now()
    })
    this.data.text = ''
  }
})

render(<todo-app />, 'body')
You can also execute this.update manually and then get the dom after update.
SSR
- https://github.com/Tencent/omi/blob/master/packages/omio/src/render-to-string.js
- https://github.com/Tencent/omi/blob/master/packages/omio/examples/render-to-string/main.js#L61-L63
renderToString(<todo-app />, {
  //contains scoped style
  scopedCSS: true
})