8.0 KiB
English | 简体中文
Omi 
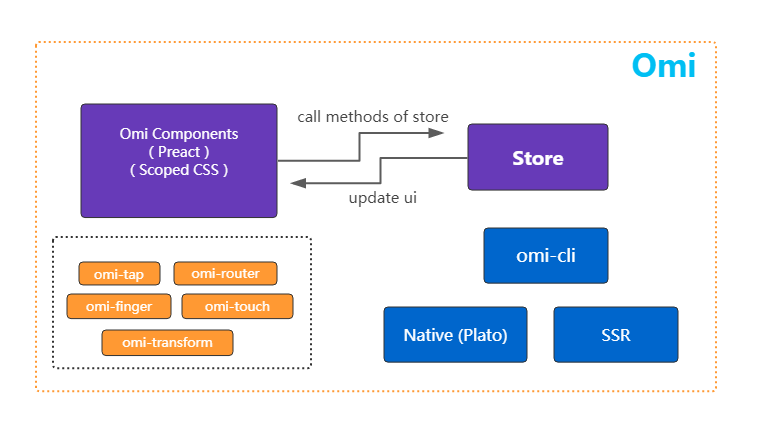
Omi === Preact + Scoped CSS + Store System + Native Support in 3kb javascript.
由于有段时间 react native 授权协议问题,内部的rn急需替代品。所以我们自研了 plato 代替 rn。做了一些权衡之后,我决定基于 preact 二次开发,把 preact 的 dom 模块更加抽象了针对浏览器和向 native 发指令。相对于 react,preact 代码尺寸更小,速度更快,jsx里的约定更贴合web的习惯 ,通过 preact compat 几乎百分百兼容react,在一些方面还在走在 react 前面 ,preact 没有自己实现事件体系,直接 addeventlinsten ,这也是性能出众和尺度极小的原因之一。Omi 从 3.0 开始基于 preact 二次开发,完全可以共享 preact 和 react 的生态,也有了自己独特的风格和优势:
- 超小的尺寸和超快的速度
- 兼容 React/Preact/Omi API
- Scoped CSS, 让你的 CSS 选择器更加简单
- 每个组件都有 update 方法,当然你也可以继续 setState
- Store system, 内置的,不需要依赖任何库
- 想要的一切都有:Server side render, ES6+, JSX, VDOM, React DevTools, HMR ...
- Native 支持,目前接入和正在接入的项目有: 腾讯课堂 QQ群 兴趣部落 QQ空间玩吧
Getting Started
Hello Omi
import { render, Component } from 'omi';

class Hello extends Component {
    render() {
        return <div> {this.props.name}</div>
    }
}

class App extends Component {
    install() {
        this.name = 'Omi'
        this.handleClick = this.handleClick.bind(this)
    }

    handleClick(e) {
        this.name = 'Hello Omi !'
        this.update()
    }

    style() {
        return `h3{
                    cursor:pointer;
                    color: ${Math.random() > 0.5 ? 'red' :'green'};
                }`
        }

    staticStyle() {
        return `div{
                    font-size:20px;
                }`
        }

    render() {
        return (
		<div>
			<Hello name={this.name}></Hello>
			<h3 onclick={this.handleClick}>Scoped css and event test! click me!</h3>
		</div>
		)
    }
}

render(<App />, 'body')
和 preact 不同的是,你不再需要 import { h } from 'omi'.
配置 Babel 转换 JSX 变成调用 Omi.h() :
{
    "presets": ["env", "omi"]
}
你需要安装这两个 babel 插件:
"babel-preset-env": "^1.6.0",
"babel-preset-omi": "^0.1.1",
Scoped CSS
style 和 staticStyle 的区别是 ? For example:
render() {
        return (
		<div>
			<Hello name={this.name}></Hello>
			<Hello name={this.name}></Hello>
			<Hello name={this.name}></Hello>
		</div>
		)
    }
如上面的例子,style方法会渲染三次,并插入到 head,而staticStyle 只会渲染一次。
当你 update 组件或者 setState 时候,style方法会渲染三次,并更新head里对应三个地方的样式,staticStyle 不再渲染。
如果你想使用 scoped css 但又不想写在 js 里, you may need to-string-loader, 看下 omi-cli config:
var styleRules = {
    'scoped.css':{
        test: /[\\|\/]_[\S]*\.css$/,
        use: [
            'to-string-loader',
            'css-loader'
        ],
        include: path.resolve(config.webpack.path.src)
    },
    'scoped.less':{
        test: /[\\|\/]_[\S]*\.less$/,
        use: [
            'to-string-loader',
            'css-loader',
            'less-loader'
        ],
        include: path.resolve(config.webpack.path.src)
    },
    'scoped.stylus':{
	...
	...
这里约定了以下划线 '_' 开头的,会经过 to-string-loader 处理成字符串。
Store
import { render, Component } from 'omi';

class Hello extends Component {
  render() {
    return <div>{this.props.name}</div>
  }
}

class App extends Component {
  constructor() {
    super()
    this.handleClick = this.handleClick.bind(this)
  }

  handleClick() {
    this.$store.rename('Hello Omi !')
  }

  render() {
    return (
      <div>
        <Hello name={this.$store.name}></Hello>
        <button onclick={this.handleClick}>Click me to call this.$store.rename('Hello Omi !') </button>
      </div>
    )
  }
}

class AppStore {
  constructor(data, callbacks) {
    this.name = data.name || ''
    this.onRename = callbacks.onRename || function () { }
  }

  rename(name) {
    this.name = name
    this.onRename()
  }
}

const app = new App()
const appStore = new AppStore({ name: 'Omi' }, {
  onRename: () => {
    app.update()
  }
})

render(app, document.body, appStore)
通过根节点注入后,你可以在所有组件中使用 this.$store 来或者 store 的数据或者调用 store 的方法。
Lifecycle
| Lifecycle method | When it gets called |
|---|---|
componentWillMount / install |
before the component gets mounted to the DOM |
componentDidMount / installed |
after the component gets mounted to the DOM |
componentWillUnmount /uninstall |
prior to removal from the DOM |
componentWillReceiveProps |
before new props get accepted |
shouldComponentUpdate |
before render(). Return false to skip render |
componentWillUpdate / beforeUpdate |
before render() |
componentDidUpdate / afterUpdate |
after render() |
CLI
$ npm i omi-cli -g               # install cli
$ omi init your_project_name     # init project, you can also exec 'omi init' in an empty folder
$ cd your_project_name           # please ignore this command if you executed 'omi init' in an empty folder
$ npm start                      # develop
$ npm run dist                   # release
Install
npm i omi
或从 CDN 获取:
Official Plugins
- omi-tap: Support tap event in your Omi project.
- omi-router: Router for Omi.
- omi-finger: Omi /AlloyFinger integration.
- omi-transform: Omi /transformjs integration.
- omi-touch: Omi /AlloyTouch integration.
Links
- preact github
- preactjs.com
- omijs.org
- server side render
- differences to react
- native support
License
MIT © dntzhang
