15 KiB
This article describes in detail the two platforms (Windows, Linux) boot disk production methods and three (full installation, dual system, virtual machine) openKylin open source operating system installation tutorial, please read according to their needs selectively.
The first step to install and use openKylin open source operating system is to get the openKylin open source operating system image file, which we can download directly from the openKylin official website.
Download link: https://www.openKylin.top/downloads
I. Make a boot disk
In the process of reinstalling or installing a system, we all go through the process of making a boot disk, and I'm sure we've read a lot of information to learn. Then by me to give you a summary of the boot disk production several methods. Welcome to take notes.
Boot disk creation tools, of which the common ones are Ventoy and Micro PE Toolbox, are similar in what they do.
First of all, they can both be used to create a boot disk, the main function is the same, but Micro PE Toolbox can also create a system CD, Ventoy can not do, in addition, Micro PE Toolbox can also set PE personalized icons, wallpapers and other personalized content.
Ventoy's function is relatively simple, it is mainly used to create system disks, no complicated functions, so its size is also relatively small, if you want to carry around, Ventoy will be more suitable.
In constant experimentation, I got Ventoy to implement all the features of the microPE toolkit! So let's install openkylin with the boot disk creation tool fixed to Ventoy!
First download the boot disk creation tool - ventoy. ventoy is different from other boot disk creation tools, we do not need to repeatedly format the U disk, just copy the image file to the U disk to boot normally, and can allow multiple image files to exist at the same time. ventoy will display a menu for us to choose when booting, very convenient and fast.
Download link: https://www.lanzoui.com/b01bd54gb or https://www.ventoy.net/cn/download.html
1. Windows system usage details
Insert the U disk and wait for the download to finish, after the download is done, unzip it, go to the unzip directory, double click to run Ventoy2Disk.exe.
The run screen is shown as follows:
 ① is the information of the inserted USB stick;
② is the version information of this Ventoy;
③ is the Ventoy version information in the USB stick (empty if Ventoy is not installed)
④ is the installation option, click Install to install Ventoy into the corresponding USB flash drive;
If the internal version is lower than the installation package version, we can click the "Upgrade" option below to upgrade.
Note: The upgrade operation is safe and will not lose the existing image files in the USB drive.
After Ventoy is successfully installed, just copy the image file of the openKylin system into the USB drive.
2. Linux system usage details
Download the Linux version zip package, unzip it, and open a terminal in the directory where the installation package was unzipped;
Execute: sudo sh VentoyWeb.sh
After entering the user password, you will be prompted that the service has been started, open a browser, and visit http://127.0.0.1:24680 directly
Note: On most systems you can press the ctrl key while clicking on the link with the mouse, no need to open the browser manually anymore.
The browser page is displayed as follows:
After that, the usage is the same as Windows mode, please refer to Windows usage.
II. Full disk installation of openKylin open source OS
Insert the created USB boot disk, reboot the computer, and press "F2" to enter the BIOS system at boot;
Next, enter the "Boot" screen with the left and right arrow keys, press the up and down arrow keys to select the "Boot Option #1" tab, enter. Select "Boot from USB" as the boot method, i.e. select your USB stick and enter.
Enter.
Afterward, use the left and right arrow keys to enter the "Save & Exit" screen, select "Save Changes and Exit", and enter. In the pop-up selection box, select "Yes" and enter.
Enter.
Now the computer starts to reboot and you will see the preparation screen for the openKylin open source OS installation:
After a short wait you will enter the new version of the system installation screen, as follows:
We select "Install openKylin" on the desktop to jump to the installation interface, the system will let us do the language, time zone and configure the user information interface. The following image shows:
After configuring this information we select the installation method screen and choose "Custom installation", as follows:
Since we are doing a full installation, we will delete the existing partitions, and add partitions after the deletion, first add the root partition, the size I have allocated here is 100G, you can allocate it according to your needs, as follows:
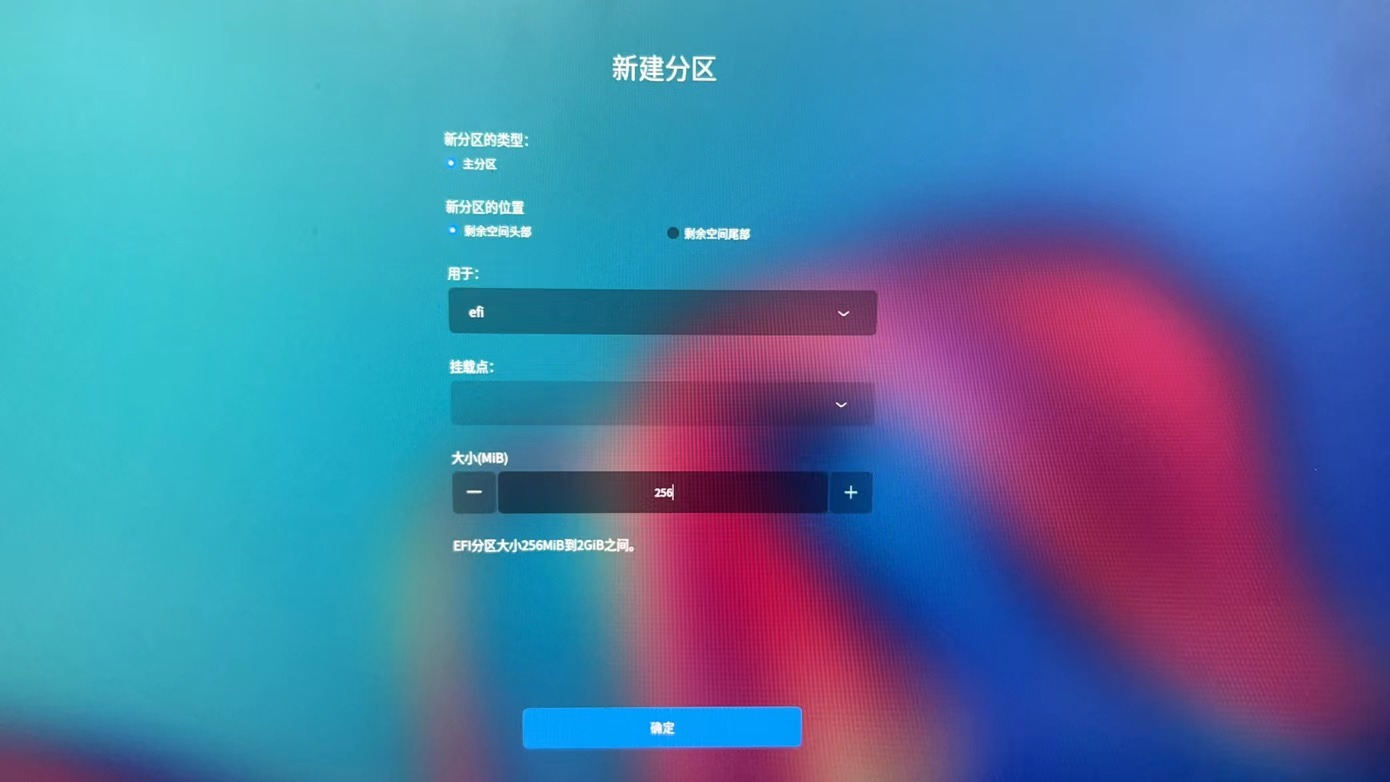
After that we add the efi partition, the efi partition is a boot partition, so 256M is sufficient.
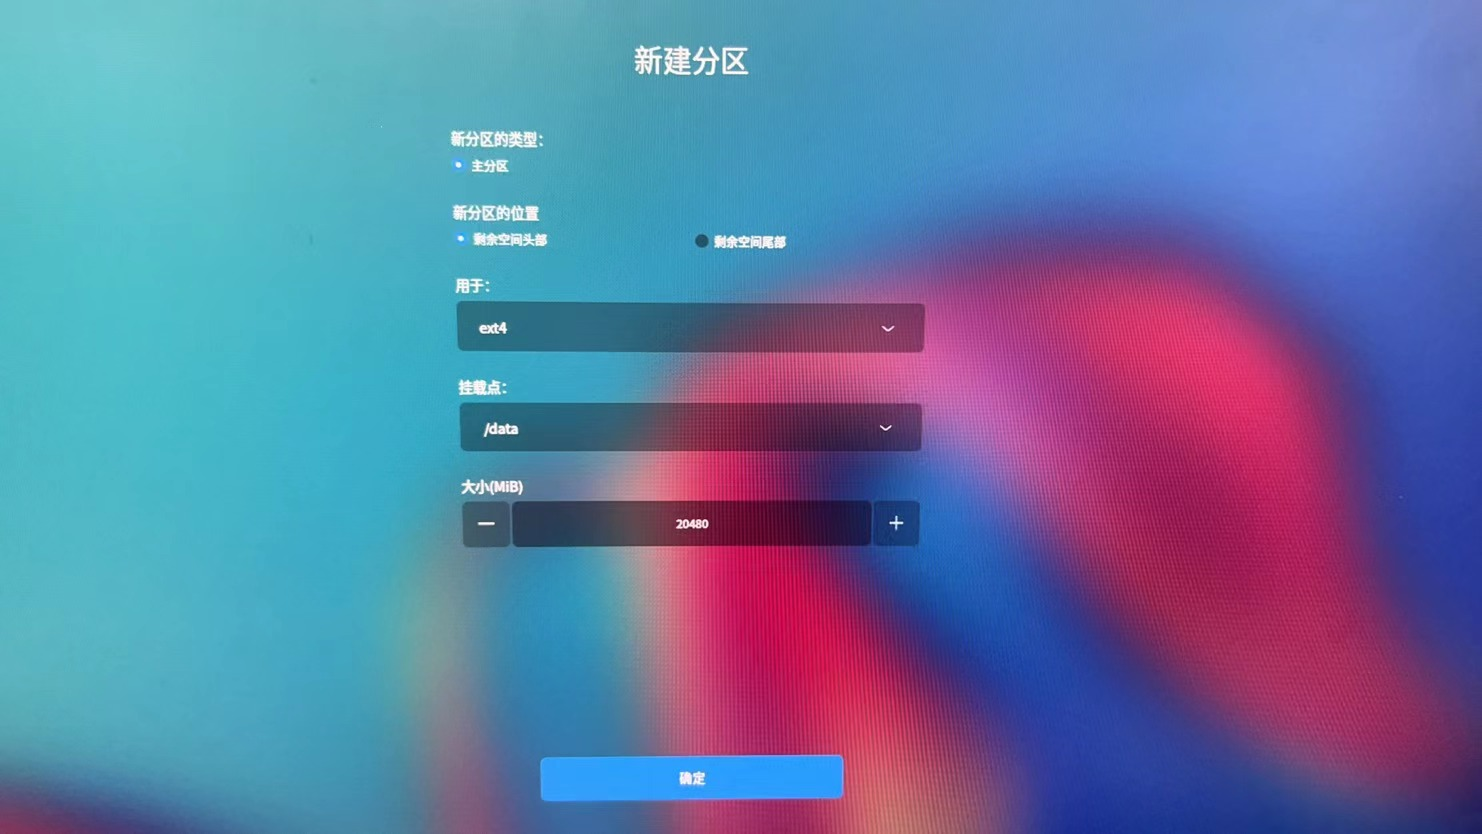
After that we add the data partition and backup partition as data partition and backup restore partition, just allocate about 20G to 30G.
Click "Next" after all allocations are done to start the installation of openKylin OS.
Wait for the installation to complete and click Reboot Now.
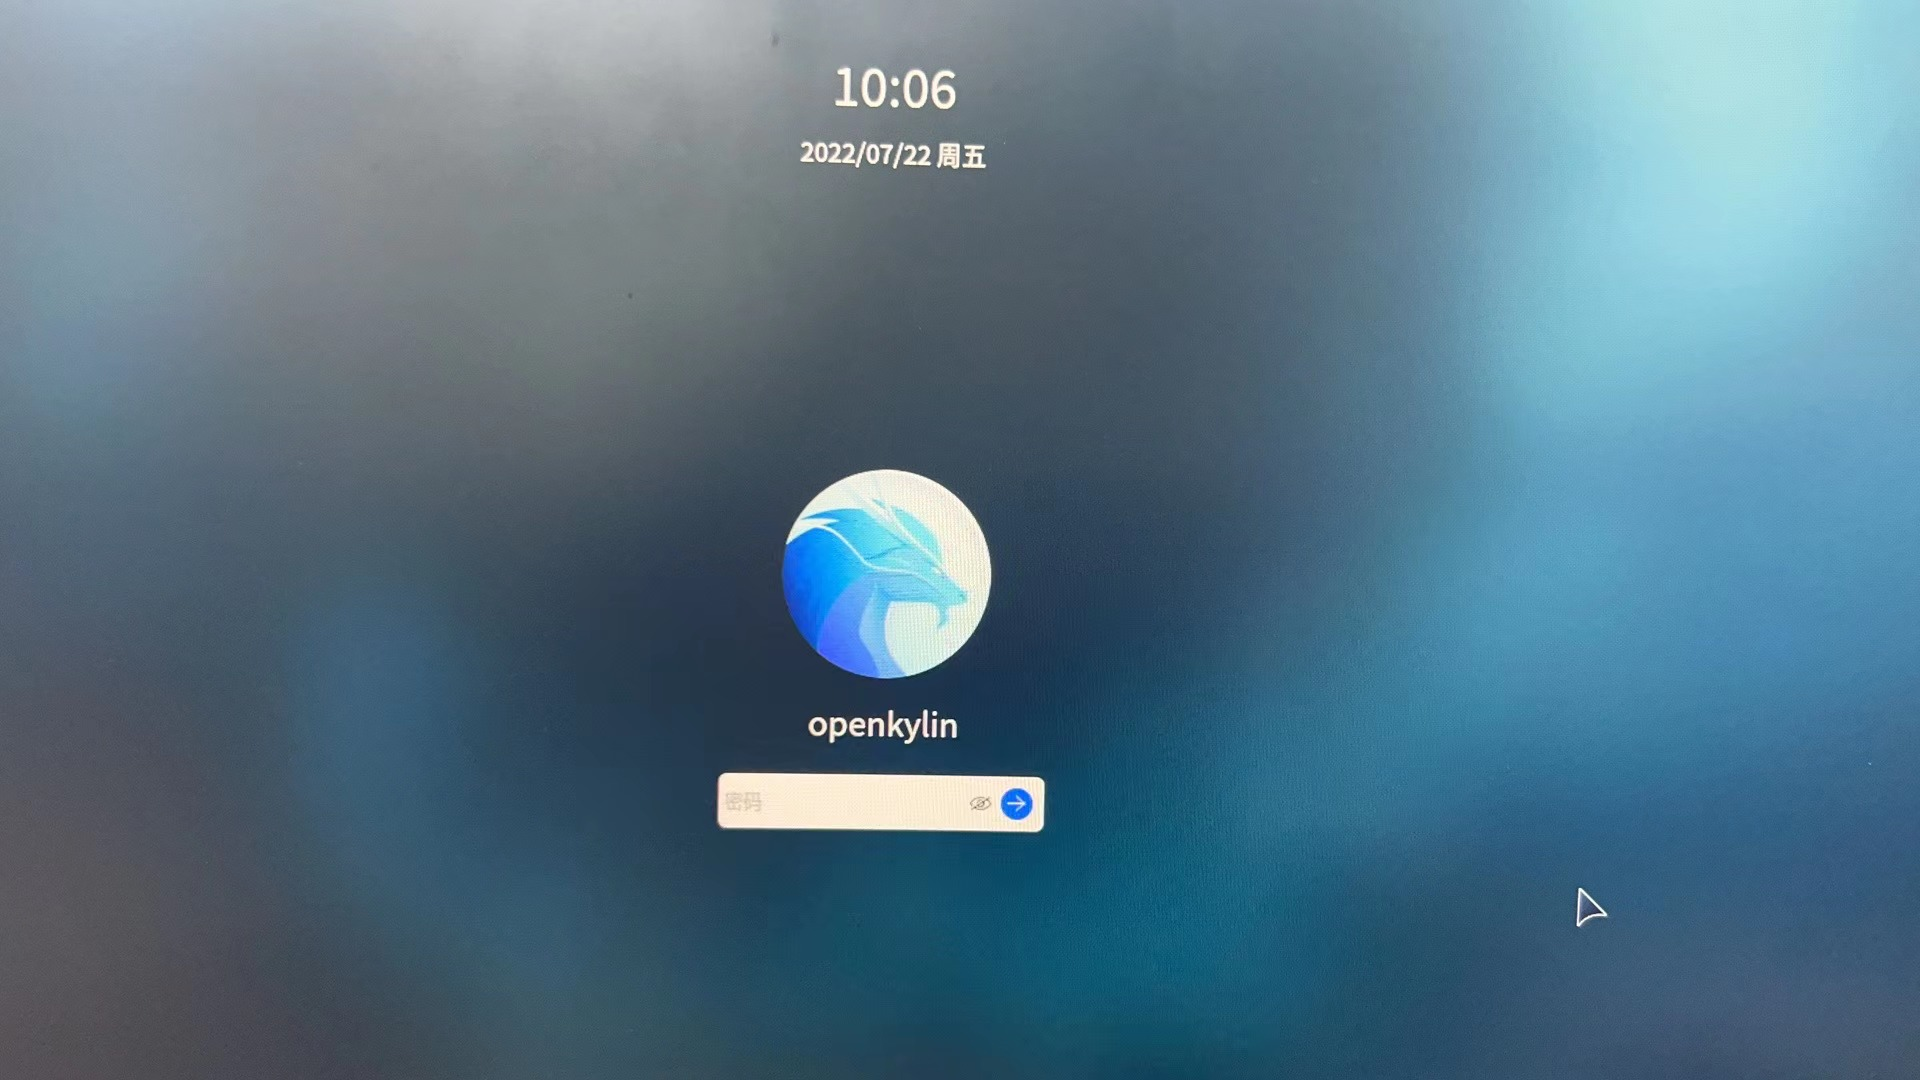
After reboot, you can use openKylin open source OS normally.
III. Install Windows 10 and openKylin dual system
First, you need to create a blank disk partition on Win10, select "This PC" - right click "Manage".
Right click on "Manage".
Go to the "Computer Management" page, click on "Storage > Disk Management", select the disk space you want to partition, right-click on the disk, and select "Compress Volume".
Right-click on the disk and select "Compressed Volume".
The compression window will pop up, enter the amount of space to be compressed, about 135G will be allocated here (it is recommended to allocate at least 30G, if the size is not enough, you can reallocate the disk space to make sure the partition has enough free space and the original partition is big enough). After confirming the amount of space to be compressed, click "Compress".
When the compression is finished, there will be one more free space and the disk partition will be finished.
Insert the created USB boot disk, restart the computer and press "F2" at boot to enter the BIOS system;
Next, enter the "Boot" screen with the left and right arrow keys, press the up and down arrow keys to select the "Boot Option #1" tab, enter. Select the boot method to boot from USB, i.e. select your own USB stick, enter.
Enter.
Afterwards, use the left and right arrow keys to enter the "Save & Exit" screen, select "Save Changes and Exit", and enter. In the pop-up selection box, select "Yes" and enter.
Enter.
Now the computer starts to reboot and you will see the preparation screen for the openKylin open source OS installation:
Wait a bit and enter the new version of openKylin installation screen, double-click "Install openKylin". The following figure shows:
Next, enter the installation configuration page - select the language, time zone and set the user information, you can set it according to your situation.
Wait until the Select installation method screen appears and select "Custom installation".
After that, go to the partition page, as follows:
As you can see, there is already a Windows system on the system, and "free" corresponds to the free partition we just compressed. Since we are installing a dual system, the next thing we need to do is to install the openKylin system in this free partition.
Select the "free" partition - click the "Add" button on the far right to enter the New partition page.
First add the root partition, the size allocated here is 80G, you can allocate it according to your needs, but make sure there is enough space available afterwards, as follows:
Since the Windows system already has an EFI boot partition, we again do not need to add an EFI boot partition. After that, add the data and backup partitions as data partition and backup restore partition, and allocate 20G each here.
Click "Next" after all allocations are done to start installing openKylin open source OS.
Wait for the installation to complete and click "Reboot Now".
After rebooting, the Select System screen will appear, as follows:
Select the system we want to enter by using the up and down keys and enter. At this point, the dual system has been installed.
IV. Install openKylin open source operating system on a virtual machine (VMware)
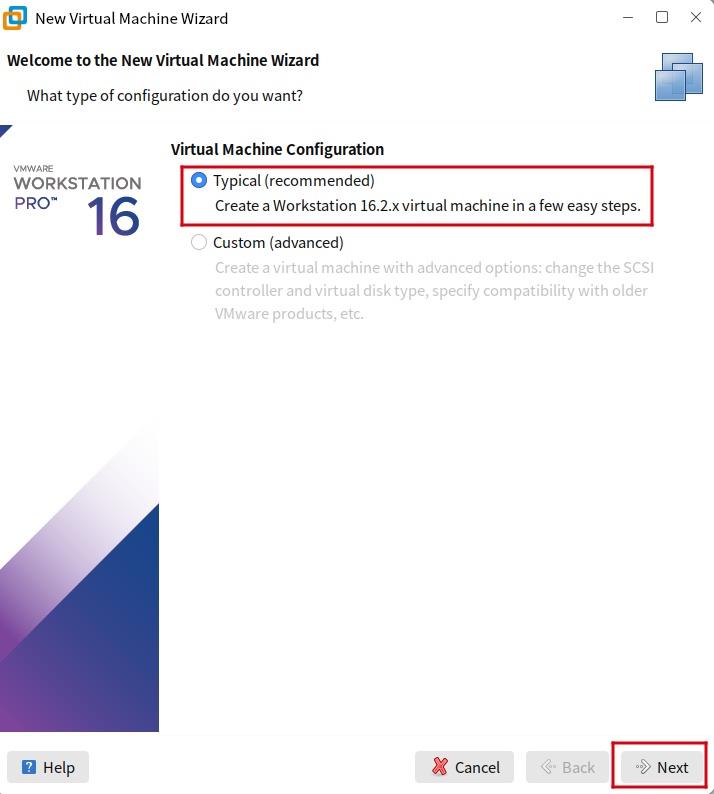
First, open VMware Workstation and click Create New Virtual Machine.
Once you enter the virtual machine boot screen, select the "Typical" option and click Next;
Select "Install the operating system later" and click Next;
Select "Linux" for the client operating system and Ubuntu 64-bit for the version, and click Next;
Enter the name of the virtual machine and choose the path to install it, and click Next;
Set the default disk size allocated to the virtual machine to 50G, 50G is perfectly sufficient under normal circumstances, you can also adjust it appropriately according to your situation. Select "Split the virtual disk into multiple files" and click Next;
Then click on "Customize hardware" to enter the hardware configuration interface;
We select our image file at "New CD/DVD (SATA)".
Then you can make a series of settings for memory, processor, etc. in the hardware configuration interface, click the Close button in the lower right corner after the settings are complete, and click Finish after returning to the New Virtual Machine orientation. At this point, you will automatically jump to the boot screen of the virtual machine, click "Open this virtual machine" to start the system installation.
Select the language setting "Chinese (Simplified)" and click Next;
Select "Shanghai" as the time zone and click Next;
When the user information is set, click Next;
Select Full installation for the installation method and click Next;
check the box Format all disks and click Install Now;
Wait for the installation to complete, click "Reboot Now", and you can use openKylin open source OS on your virtual machine.


