12 KiB
Using KVM Virtual Machines
Author:ymz316
2022-05-12 17:50:00
KVM (Kernel-based Virtual Machine) is a kernel-based (kernel built-in) virtual machine. It is generally used by QEMU to complete the creation of virtual machines, and the suffix name of the virtual machine image is mostly qcow2.
Notes before installing a KVM virtual machine.
- KVM itself does not emulate any hardware devices, it uses virtualization capabilities provided by hardware such as (Intel VT-x, AMD-V, ARM virtualization extensions, etc.), so KVM requires chip support and enables virtualization technology (Intel's VT extensions or AMD's AMD-V extensions).
- KVM requires QEMU to work with hardware devices such as motherboard, memory and I/O emulation, and also requires the installation of some management software packages for the purpose of rapid virtual machine creation.
- Virtual machine installation requires the use of a network, so you need to first configure network information to provide network device support for the virtual machine installation.
- Once the above is ready, you can create a virtual machine.
I. Prerequisites for KVM installation
1) Verify support for hardware virtualization (Intel's VT extensions or AMD's AMD-V extensions)
$ LC_ALL=C lscpu | grep Virtualization
Virtualization:                  VT-x
Or:
$ grep -Eoc '(vmx|svm)' /proc/cpuinfo   #或者 egrep -c '(vmx|svm)' /proc/cpuinfo
16
If a number greater than zero is output (i.e., the number of CPU cores), the CPU supports hardware virtualization; if 0 is output, the CPU does not support hardware virtualization, try rebooting into the BIOS settings to enable VT technology.
Note: The $ here is the terminal prompt and does not need to be copied
2)Determine if the server is capable of running hardware-accelerated KVM virtual machines
$ kvm-ok   #If prompted for this command, install it by sudo apt install cpu-checker
INFO: /dev/kvm exists
KVM acceleration can be used
Note: The $ here is the terminal prompt and does not need to be copied
II. Install the KVM virtualization management package
KVM Related virtualization management packages
qemu-kvm :This package is required for 20.04, but it seems to be integrated in 22.04 and does not need to be installed.
libvirt:A collection of software to manage virtual machines and other virtualization functions (e.g. storage management, network management). It includes an API library, a daemon (libvirtd) and a command line tool (virsh). It provides a common API for common functions implemented by supported virtual machine monitors. libvirt's main goal is to provide a unified and reliable set of APIs for various virtualization tools, allowing the upper layers to manage multiple different virtualization technologies in a single way, including KVM, vmware, XEN, Hyper-v, LXC and other hypervisors. Hypervisor requires the installation of the libvirt-daemon-system package to use the libvirt daemon as a configuration file for running system services.
libvirt-clients :This package is used to manage the software of the virtualization platform and is usually installed automatically when libvirt-daemon-system is installed.
virt-manager :libvirt-based GUI tools (graphical user interface).
virtinst :A set of command line tools for creating virtual machines. Normally, this package is automatically installed when virt-manager is installed.
bridge-utils :Command line tool for configuring Ethernet bridges.
ovmf:The UEFI firmware for the virtual machine is installed so that the virtual machine system can boot from uefi.
The installation command is:
sudo apt install qemu qemu-kvm libvirt-daemon-system virt-manager bridge-utils ovmf
III. Client network configuration
After the client is installed, you need to set up a network interface for it to communicate with the host network and the network between the clients. The linux system needs to use the network communication when it is installed, so you have to set up the network connection for the client in advance.
KVM There are two ways to connect to the client network.
- User Networking: Also known as the NAT method. A simple way to allow virtual machines to access resources on the host, Internet or local network, but they cannot be accessed from the network or other clients, and performance requires major tuning.
- Virtual Bridge: Also known as the Bridge approach, the Bridge approach allows a virtual machine to become a host with a separate IP on the network, so clients and machines inside the subnet can communicate with each other. This method is a little more complicated than the user network, but it is easy to communicate between the client and the Internet and between the client and the host after setup.
To learn about NAT as an example.
Type sudo virt-manager in the terminal or click on Virtual System Manager in the start menu to open the virt-manager GUI.

Click "Edit" - "Connection Details" to enter the network configuration interface, and select the virtual network, where by default there is a default NAT network connection, the device name is virbr0, the network segment is 192.168.122.0/24.

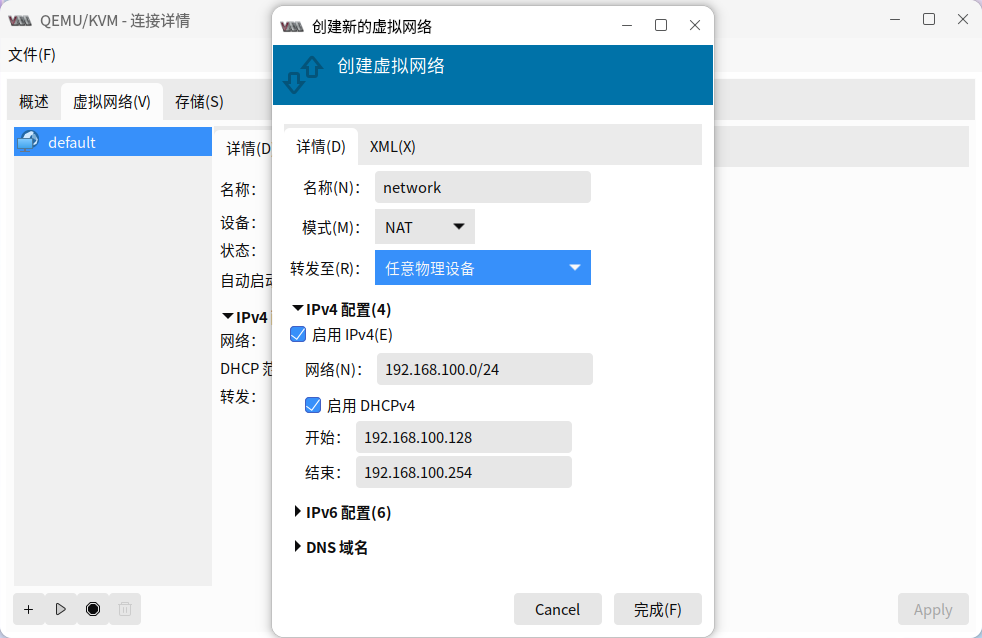
You can click the plus sign below to create a new network connection, here we create a network connection named network, forward to select "any physical device" (will create a network card device virbr1), network segment for 192.168.100.0/24, set up DHCP, click Finish to configure successfully. The next step in the virtual machine installation process can be set to this network connection method.
IV. Customer Virtual Machine Installation
Virtual machine installation can be done through virt-manager graphical tool or through qemu-img command.
1. virt-manager graphical tool installation
Open the virt-manager GUI by typing sudo virt-manager in the terminal or clicking on Virtual System Manager in the start menu.
- Click "File" - "Create Virtual Machine", or click the Create Virtual Machine icon, then select the local installation media and click Forward.
Note: If we have already copied a disk image of the virtual machine online or elsewhere with the system already installed, you can select "Import existing disk image".

- Select the installation source (ISO) and virtual machine system format (such as red hat Linux 8 or something like that) and click forward.

- Enter the virtual machine memory, the number of cpu cores (can not be greater than the number of host cores), click forward.

- Select the disk image (virtual machine installation should also have a virtual disk, right), here we create a 40G disk, click forward.
Note: The default disk image path here is /var/lib/libirt/images/*.qcow2, while if we need to use an already created disk image or need to customize the storage location of the disk image, you can select "Select or create custom storage"

- Enter the virtual machine instance name, select the network, and click Forward.
If you don't know how to choose a network, you may want to brush up on your knowledge of several modes of virtual machine networking (NAT, bridge, only_host).

- At this point, it is time to enter the installation of the virtual machine system.

If you are prompted with the error "Error connecting to graphics console: Error opening Spice console, SpiceClientGtk missing", you can try the following command to solve it.
hollowman@hollowman-F117:~$ apt search SpiceClientGtk
Sorting... Done
Full text search... Done
gir1.2-spiceclientgtk-3.0/focal 0.37-2fakesync1 amd64
  GTK3 widget for SPICE clients (GObject-Introspection)

hollowman@hollowman-F117:~$ sudo apt install gir1.2-spiceclientgtk-3.0
2. Command installation
1) Create a virtual machine disk image
$ qemu-img create -f qcow2 diskname.qcow2 40G
$ ll -h diskname.qcow2   #Check the size of the image on the host system, although there is 40G disk, but because there is no data, it actually occupies only 196K
-rwxrwxrwx 1 hollowman hollowman 196K November 24 13:30 diskname.qcow2*
2) Install the virtual machine (virt-install command)
a. Create a virtual machine from an ISO image.
# virt-install --name client instance name --memory memory memory size --vcpus cpu cores --disk path=disk image path --cdrom=installation media path --network network interface --cdrom=installation media path
#Example:
$ virt-install --name rhel8 --memory 2048 --vcpus 2 --disk path=./rhel8.qcow2 --cdrom=/media/hollowman/软件/ISO/rhel-8.0-x86_64-linuxprobe.com.iso --network bridge=virbr1
b. Create a virtual machine from an existing qcow disk image
# virt-install --name client instance name --memory memory memory size --vcpus cpu cores --disk path=disk image path --network network interface --import
#Example:
$sudo virt-install --name openEuler2109 --memory 2048 --vcpus 2 --disk path=./openEuler-21.09-x86_64.qcow2 --network bridge=virbr1 --import
Descriptions of virt-install related options can be viewed with the command.
$ virt-install help # The following is a partial excerpt

General options:
  -n NAME, --name NAME Client instance name
  --memory MEMORY The size of the client memory. Example: --memory 1024 (in MiB)
  --vcpus VCPUS Number of client cpu cores (not larger than host cores). For example:--vcpus 5

Installation method options:
  --cdrom CDROM CD-ROM drive installation media
  --import Build the client from an existing disk image

OS options:
  --os-variant OS_VARIANT Specify the operating system type. For example: rhl8.0, you can see all OS types with the 'osinfo-query' command

Device options:
  --disk DISK Specifies various options for storage. For example: --disk size=10 (creates a 10GiB image in the default location)
  -w NETWORK, --network NETWORK Configure the client network interface. For example: --network bridge=mybr0
V. Problems found in the virtual machine management process to deal with
- qcow2 image occupies too much space
If you create a 40G disk image through virt-manager GUI, you find that the storage space on the host is 40G, such a large footprint, is it OCD? We can deal with it by command compression.
As follows, we check the disk image information created by virt-manager.
$ qemu-img info rhel8.qcow2   #Viewing disk image information
image: rhel8.qcow2
file format: qcow2
virtual size: 40 GiB (42949672960 bytes)     #Virtual Disk Size
disk size: 196 KiB                           #This is the actual space occupied by the mirror
cluster_size: 65536
Format specific information:
    compat: 1.1
    lazy refcounts: false
    refcount bits: 16
    corrupt: false

$ ll -h rhel8.qcow2   #View the storage space of the image on the host system (this is the disk created via virt-manager)
-rwxrwxrwx 1 hollowman hollowman 40G November 24 13:48 rhel8.qcow2*
Enter the compression command.
$ qemu-img convert -O qcow2 rhel8.qcow2 rhel8_new.qcow2
$ ll -h rhel8_new.qcow2
-rwxrwxrwx 1 hollowman hollowman 196K November 24 13:52 rhel8_new.qcow2*
You can find that the storage space has changed back to 196K.
- Mount the qcow2 disk image on the host system
qcow2 is essentially a virtual disk image, so the contents of this disk image partition can be read on the host system by mounting the disk image partition (in the case of a virtual machine disk, this needs to be done with the virtual machine turned off).
- When creating a virtual machine, there is a prompt that the 'libvirt-qemu' user does not have permission to search for directory-related records, and the creation is unsuccessful.
Check and modify the configuration file /etc/libvirt/qemu.conf, find the line # user = "root" and remove the comment, restart the libvirtd service
$ sudo pluma /etc/libvirt/qemu.conf     #Modify the following line
user = "root"

$ systemctl restart libvirtd
- When opening the virtual machine, "Error connecting to the graphics console: Error opening SPICE console: Namespace SpiceClientGtk not available" appears
sudo apt install spice-client-gtk gir1.2-spiceclientgtk-3.0