14 KiB
Create and import a map
- Introduction
- Map creation with RoadRunner
- Import a map into CARLA
- Final tips
- Previous ways to import a map
Introduction
In order to create a CARLA map, two elements are needed. This tutorial explains how to properly import them to CARLA.
.fbxbinaries. The meshes needed to build the map, such as roads, lanemarkings, sidewalks, ect..xodrOpenDRIVE file. Contains the road network information necessary for vehicles to navigate the map.
In order to create them, RoadRunner is the recommended software. It is quite easy to use, and it provides plugins that make the import process much simpler. Some basic steps are provided below.
The process to import a map into CARLA is now out-of-the-box. A Docker image of Unreal Engine is used so that the user does not have neither to compile anything nor manually set the assets to fit into CARLA.
!!! Note This tutorial creates a new map from scratch. Check these other tutorials to customize a town or import other assets to CARLA.
Map creation with RoadRunner
RoadRunner is an accessible and powerful software from Vector Zero to create 3D scenes. There is a trial version available at their site, and an installation guide.
The process is quite straightforward, but there are some things to take into account.
- Center the map in (0,0).
- Create the map definition. Take a look at the official tutorials.
- Check the map validation. Take a close look at all connections and geometries.
Once the map is ready, click on the OpenDRIVE Preview Tool button to visualize the OpenDRIVE road network. Give one last check to everything. Once the map is exported, it cannot be modified.
!!! note
OpenDrive Preview Tool makes it easier to test the integrity of the map. If there is any error with junctions, click on Maneuver Tool, and Rebuild Maneuver Roads.
Export the map
1. Export the scene using the CARLA option. File/Export/CARLA(.fbx+.xml+.xodr)
2. Leave Export individual Tiles unchecked. This will generate only one .fbx with all the pieces. It makes easier to keep track of the map.
3. Click Export.
This will generate a mapname.fbx and mapname.xodr files within others. There is more detailed information about how to export to CARLA in VectorZero's documentation.
!!! Warning Make sure that the .xodr and the .fbx files have the same name.
Import a map into CARLA
This process will cook the map automatically from start to finish. Using only the .fbx and .xodr, the output will provide a fully usable CARLA map with traffic behaviour, and pedestrian navigation already implemented.
1. Build a Docker image of Unreal Engine. Follow these instructions. The process takes quite a lot of time and disk space. Around 4h and 400GB to build the Docker image. However, this is only needed the first time. Then, the process of importing a new map is out-of-the-box.
2. Run the script to cook the map. In the folder ~/carla/Util/Docker there is a script that connects with the Docker image previously created, and cooks the map automatically. It only needs the path for the input and output files.
python docker_tools.py --input ~/path_to_input_assets --output ~/path_for_output_assets
3. Move the output files to Content/Carla/Maps in case they are not already there.
Final tips
- Add and test traffic light timing. This are not set automatically, and will need trial and error to fit perfectly with the city.
Example: Traffic Signs, Traffic lights and Turn based stop.
-
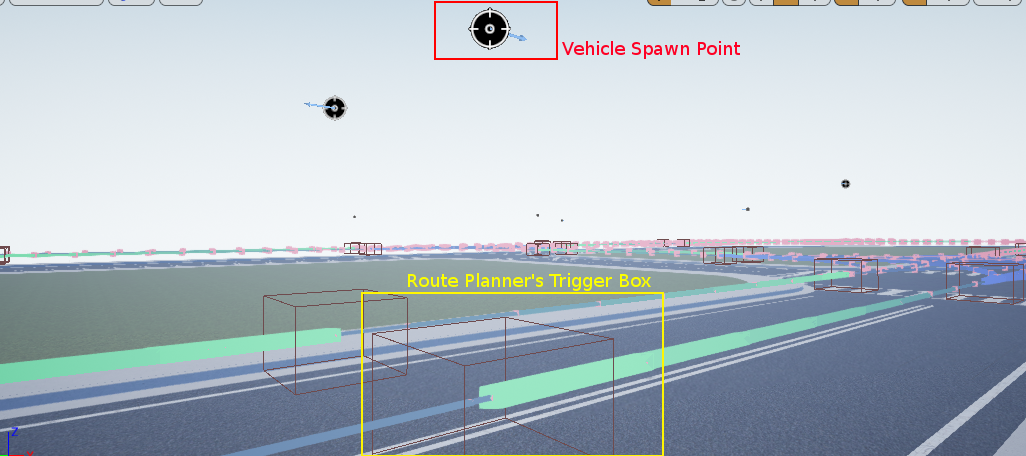
Place vehicle spawn points 2 to 3 meters above a Route Planner's trigger box, and oriented in the same direction. When the vehicle falls into the trigger box, the autopilot takes control of it.
-
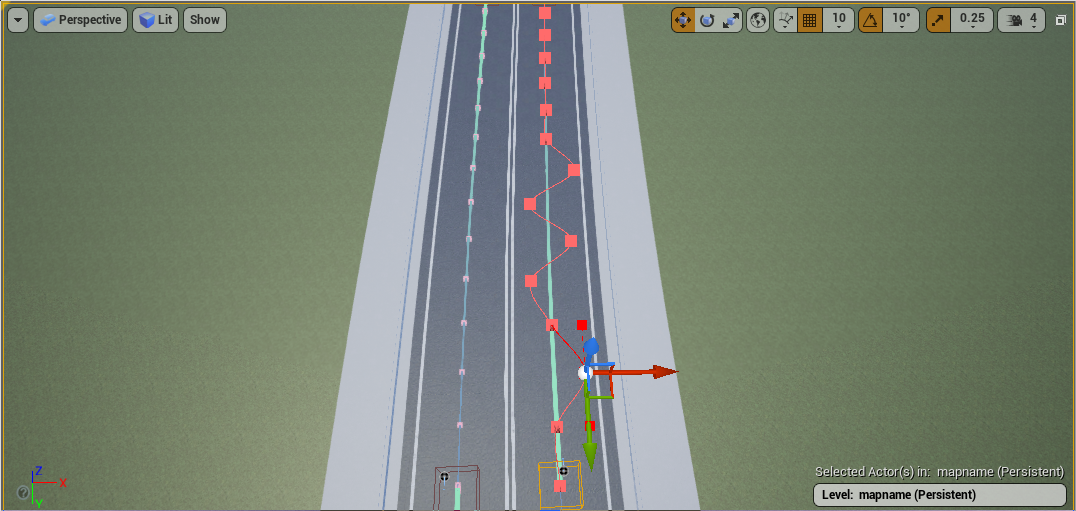
Show individual route planners.
Generate Routesin Open Drive Actor generates the road network but it does not show these. In order to do so, do the following.- Select all
RoutePlanneractors. - Move them.
- Press
ctr + z. They will show up on the map.
- Select all
-
Modify OpenDRIVE routes. This can be done manually.
-
Add the map to the Unreal packaging system. Go to the following path and add the level.
Edit > Project Settings > Project > Packaging > Show Advanced > List of maps to include...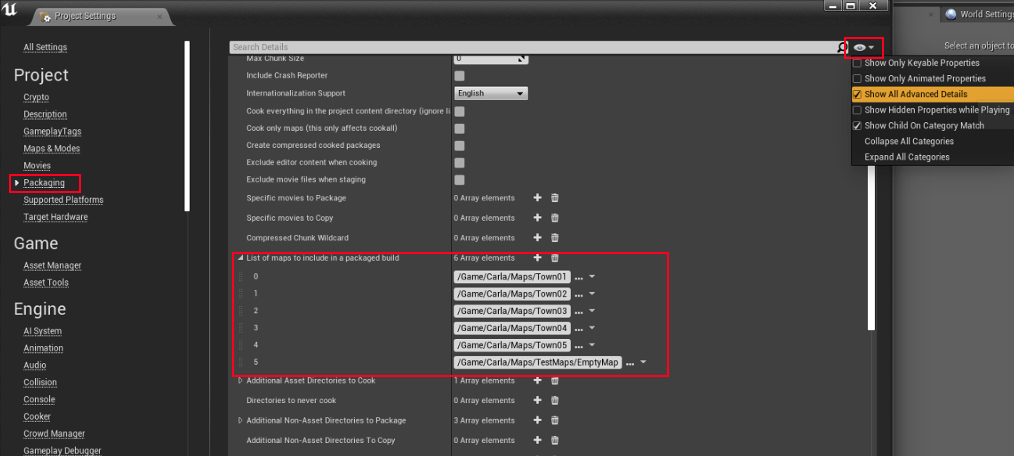
-
Use CARLA materials contained in
Content/Carla/Static/GenericMaterials.- Go to the material.
Right-click on the Asset > Browse to Asset. - Set the actors.
Right-click on Material > Asset Actions > Select Actors Using This Asset
- Go to the material.
Previous ways to import a map
There are other ways to import a map used in previous CARLA releases. These required to manually cook the map and prepare everything, so they became deprecated when the Docker method was developed. However, they are explained below in case they are needed.
-
A) RoadRunner plugin import. This software provides specific plugins for CARLA. Get those and follow some simple steps to get the map.
-
B) Manual import. This process requires to go through all the process manually. From importing .fbx and .xodr to setting the static meshes.
Deprecated tutorials to import a map
!!! Warning These importing tutorials are deprecated. The best way to import a map into CARLA is to use the Docker as explained above.
A- RoadRunner plugin import
Plugin installation
These plugins will set everything ready to be used in CARLA. It makes the import process more simple.
1. Locate the plugins in RoadRunner's installation folder
/usr/bin/VectorZero/Tools/Unreal/Plugins.
2. Copy those folders to the CarlaUE4 plugins directory /carla/Unreal/CarlaUE4/Plugins/.
3. Rebuild the plugin following the instructions below.
-
a) Rebuild on Windows.
- Right-click the
.uprojectfile andGenerate Visual Studio project files. - Open the project and build the plugins.
- Right-click the
-
b) Rebuild on Linux.
- Run the following command.
> UE4_ROOT/GenerateProjectFiles.sh -project="carla/Unreal/CarlaUE4/CarlaUE4.uproject" -game -engine
4. Restart Unreal Engine. Make sure the checkbox is on for both plugins Edit > Plugins.
Import map
1. Import the mapname.fbx file to a new folder under /Content/Carla/Maps with the Import button.
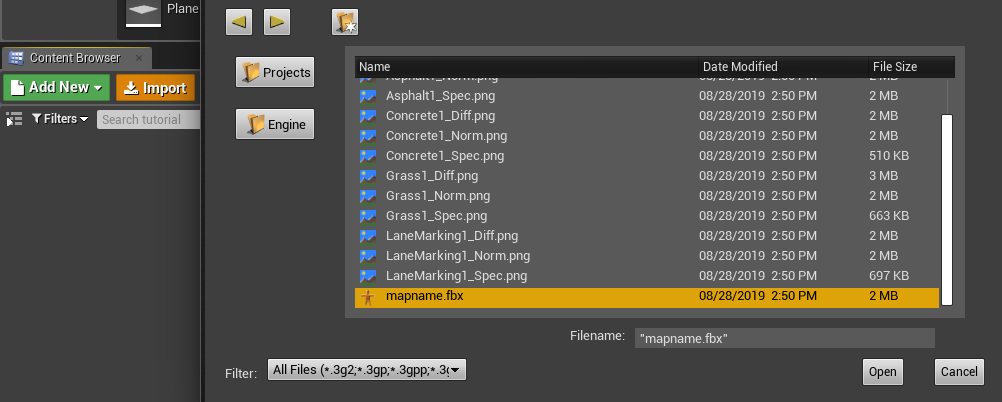
2. Set Scene > Hierarchy Type to Create One Blueprint Asset (selected by default).
3. Set Static Meshes > Normal Import Method to Import Normals.
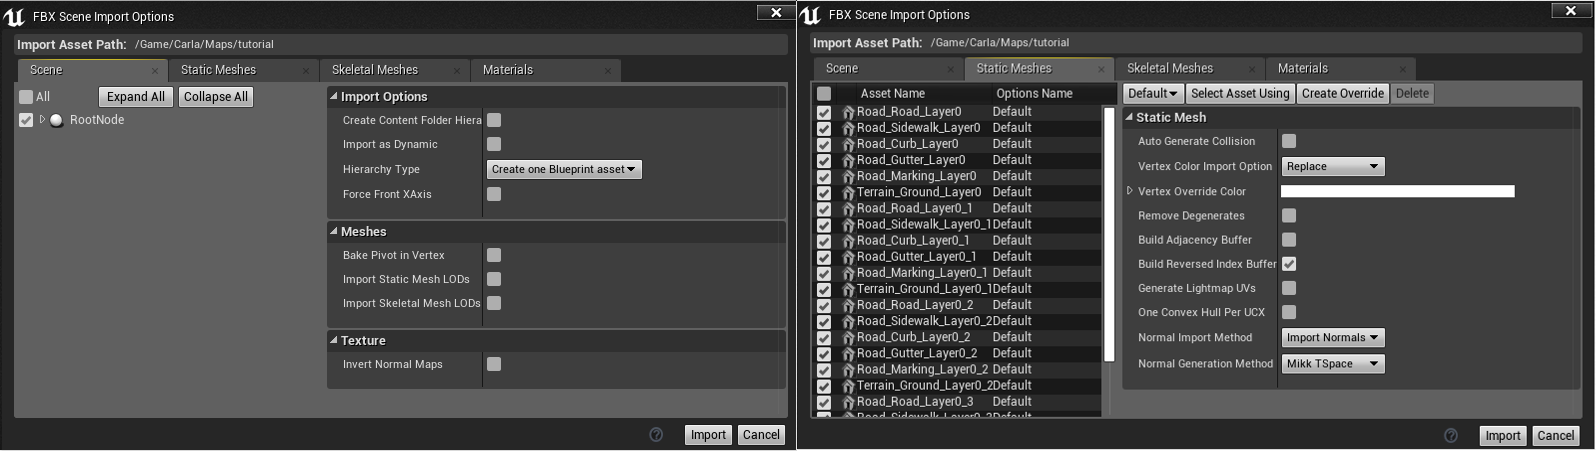
4. Click Import.
5. Save the current level File > Save Current As... > mapname.
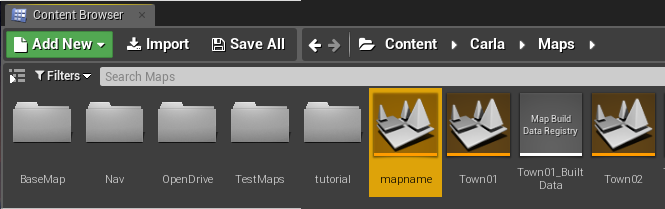
The new map should now appear next to the others in the Unreal Engine Content Browser.
B- Manual import from files
This is the generic way to import maps into Unreal Engine using any .fbx and .xodr files. As there is no plugin to ease the process, there are many settings to be done before the map is available in CARLA.
1. Create a new level with the Map name in Unreal Add New > Level under Content/Carla/Maps.
2. Copy the illumination folder and its content from the BaseMap Content/Carla/Maps/BaseMap, and paste it in the new level. Otherwise, the map will be in the dark.

Import binaries
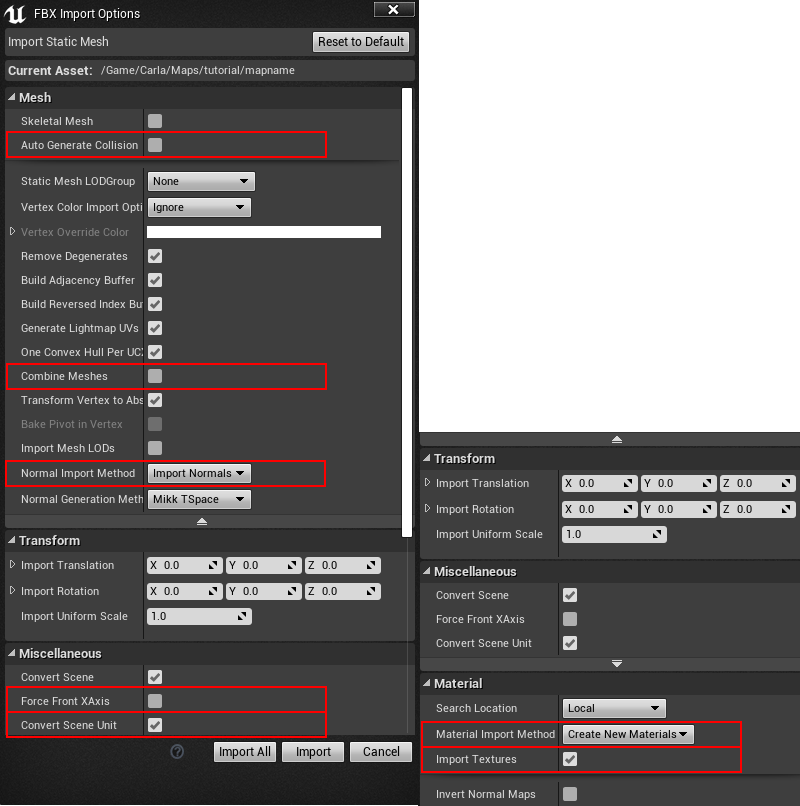
1. Import the mapname.fbx file to a new folder under /Content/Carla/Maps with the Import button. Make sure the following options are unchecked.
- Auto Generate Collision
- Combine Meshes
- Force Front xAxis
- Normal Import Method - To import normals
2. Check the following options.
- Convert Scene Unit
- To import materials and textures.
- Material Import Method - To create new materials
- Import Textures
3. Check that the static meshes have appeared in the chosen folder.
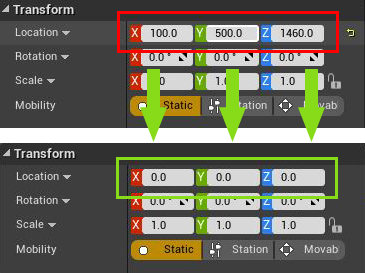
4. Drag the meshes into the level.
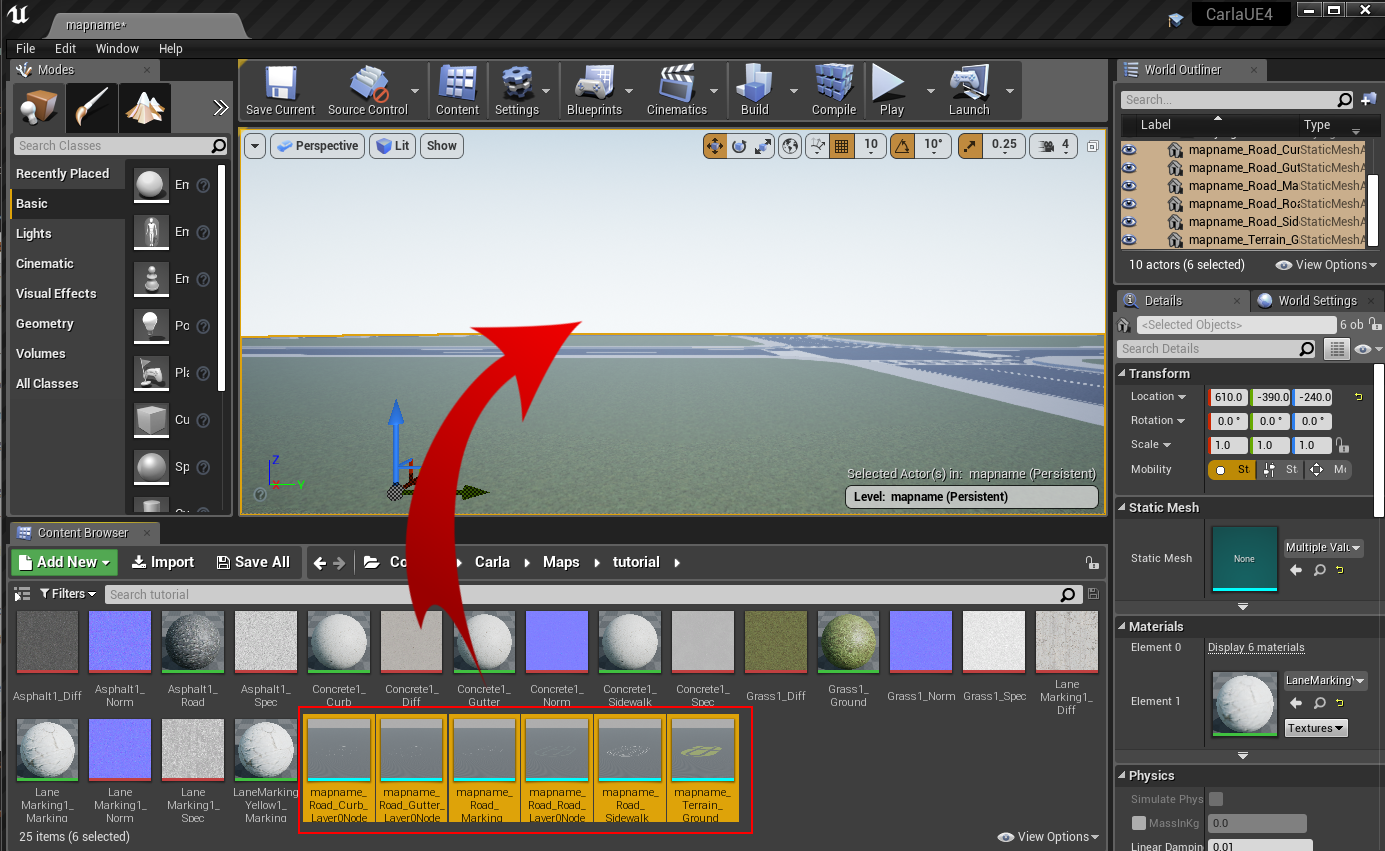
5. Center the meshes at point (0,0,0) when Unreal finishes loading.
6. Generate collisions. Otherwise, pedestrians and vehicles will fall into the abyss.
-
Select the meshes meant to have colliders.
-
Right-click
Asset Actions > Bulk Edit via Property Matrix....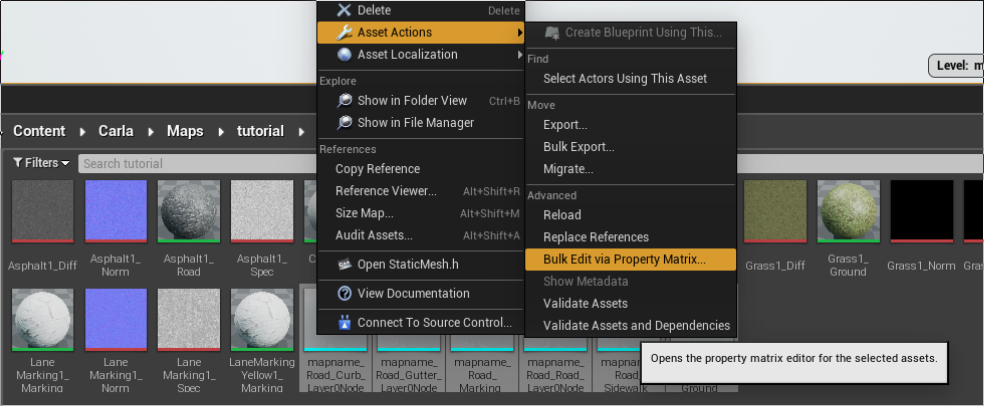
-
Search for collision in Property's Matrix search box.
-
Change
Collision complexityfromProject DefaulttoUse Complex Collision As Simple.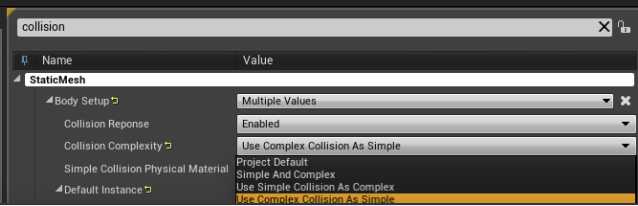
-
Go to
File > Save All.
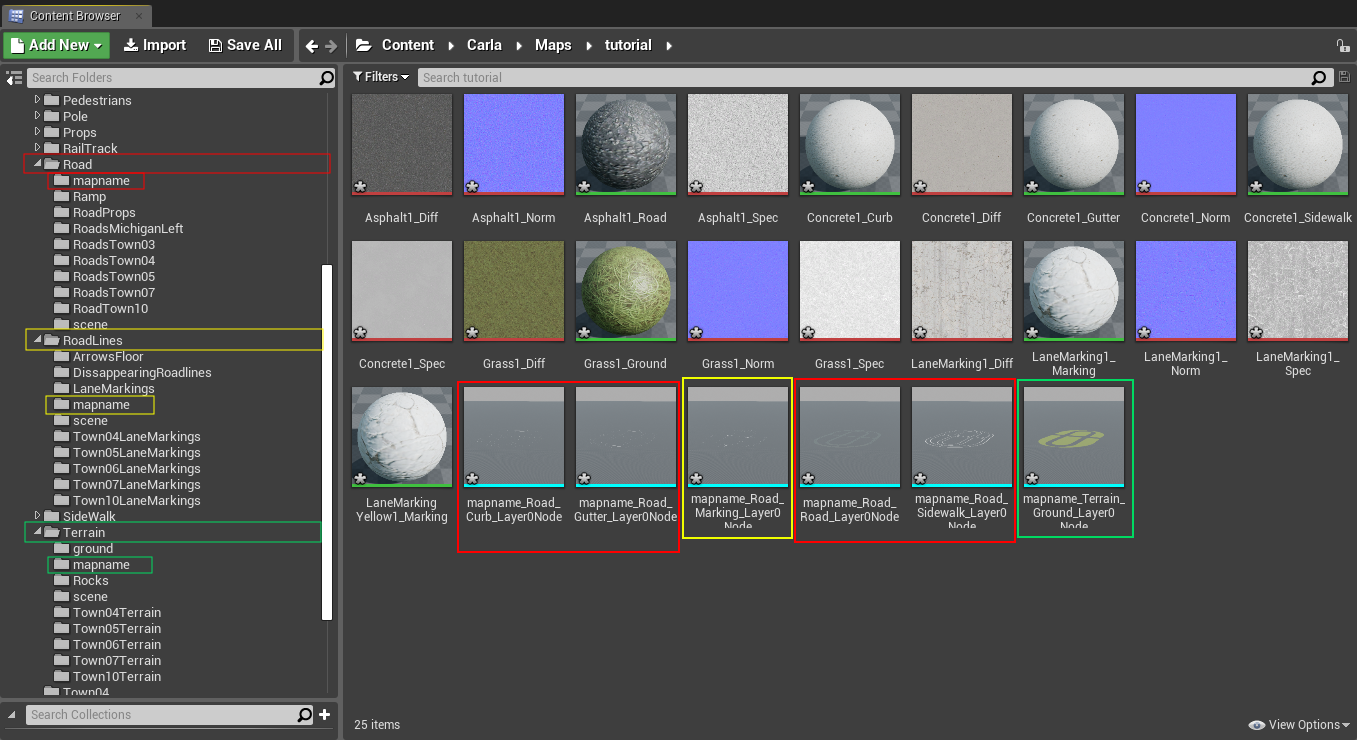
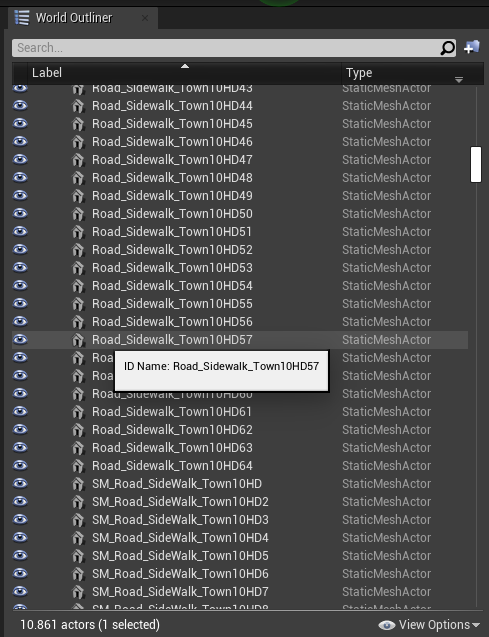
7. Move the static meshes from Content/Carla/Maps/mapfolder to the corresponding Carla/Static subsequent folder. This will be meaningful for the semantic segmentation ground truth.
Terrain/mapnameRoad/mapnameRoadLines/mapname
Content
└── Carla
    ├── Blueprints
    ├── Config
    ├── Exported Maps
    ├── HDMaps
    ├── Maps
    └── Static
        ├── Terrain
        │   └── mapname
        │       └── Static Meshes
        │
        ├── Road
        │   └── mapname
        │       └── Static Meshes
        │
        ├── RoadLines
        |   └── mapname
        |       └── Static Meshes
        └── Sidewalks
            └── mapname
                └── Static Meshes
Import OpenDRIVE files
1. Copy the .xodr file inside the Content/Carla/Maps/OpenDrive folder.
2. Open the Unreal level. Drag the Open Drive Actor inside the level. It will read the level's name. Search the Opendrive file with the same name and load it.
Set traffic behavior
Once everything is loaded into the level, it is time to create traffic behavior.
1. Click on the Open Drive Actor.
2. Check the following boxes in the same order.
- Add Spawners.
- (Optional for more spawn points) On Intersections.
- Generate Routes.
This will generate a series of RoutePlanner and VehicleSpawnPoint actors. These are used for vehicle spawning and navigation.
Traffic lights and signs
Traffic lights and signs must be placed all over the map.
1. Drag traffic light/sign actors into the level and place them.
2. Adjust the [trigger volume][triggerlink] for each of them. This will determine their area of influence.
[triggerlink]: python_api.md#carla.TrafficSign.trigger_volume
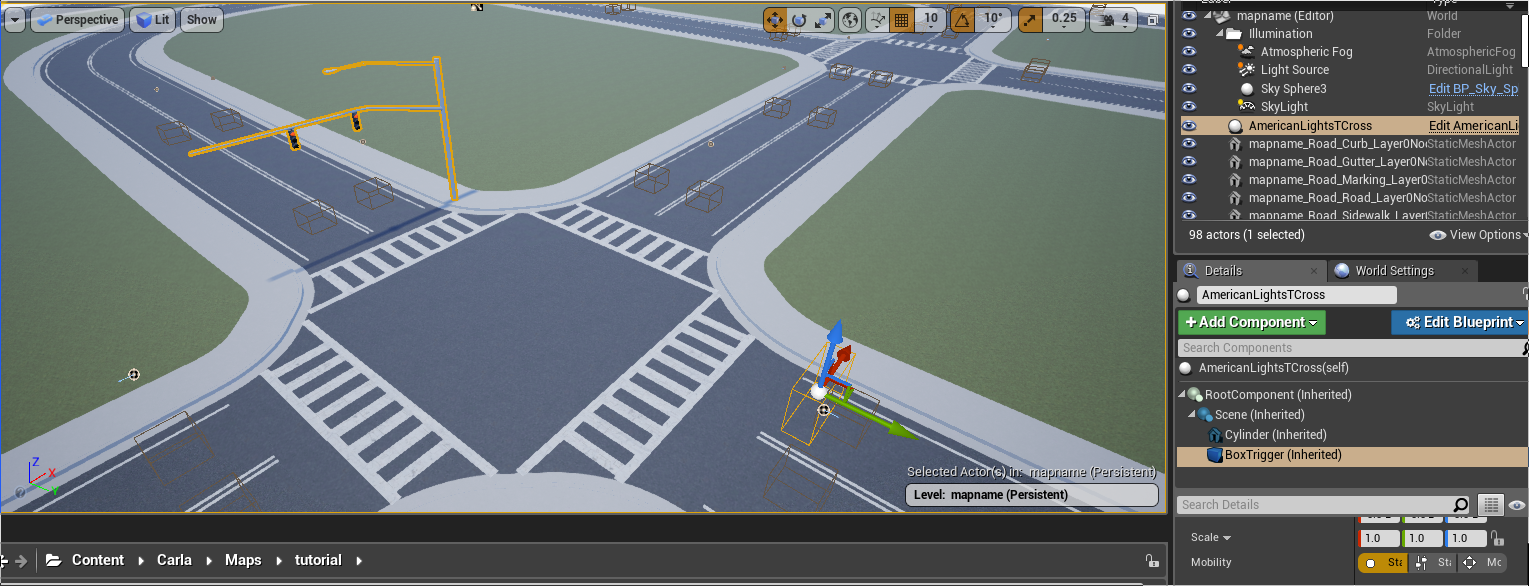
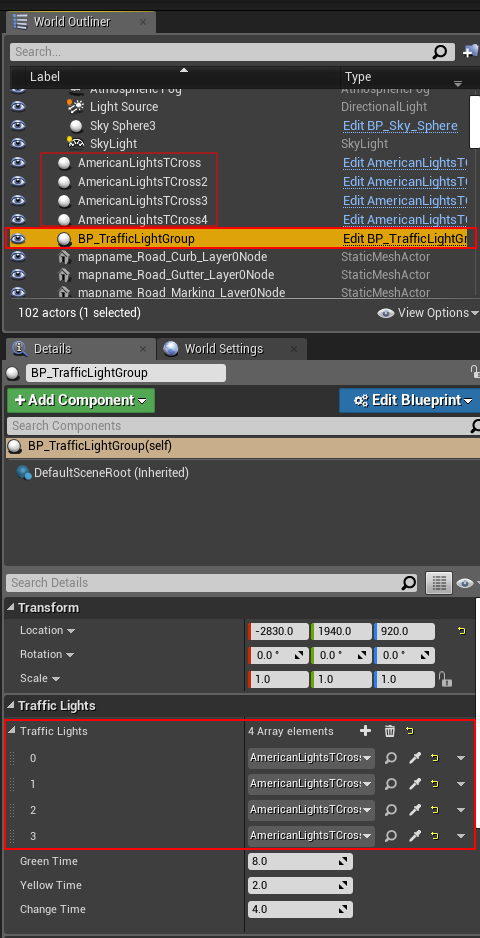
3. In junctions, drag a traffic light group actor into the level. Assign to it all the traffic lights involved and configure their timing. Make sure to understand how do traffic lights work.
4. Test traffic light timing and traffic trigger volumes. This may need trial and error to fit perfectly.
Example: Traffic Signs, Traffic lights and Turn based stop.
Add pedestrian navigation
In order to prepare the map for pedestrian navigation, there are some settings to be done before exporting it.
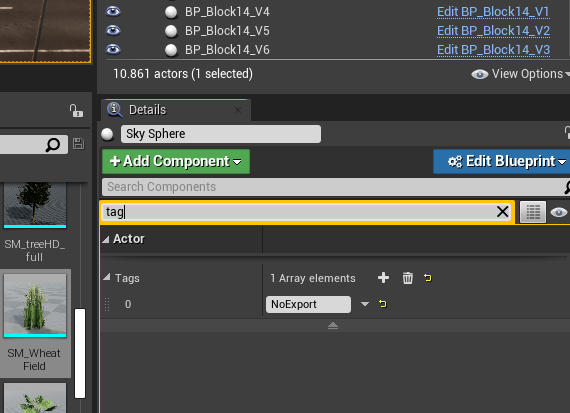
1. Select the Skybox object and add a tag NoExport to it. Otherwise, the map will not be exported, as the size would be too big.
2. Check the name of the meshes. By default, pedestrians will be able to walk over sidewalks, crosswalks, and grass (with minor influence over the rest).
3. Crosswalks have to be manually created. For each of them, create a plane mesh that extends a bit over both sidewalks connected. Place it overlapping the ground, and disable its physics and rendering.
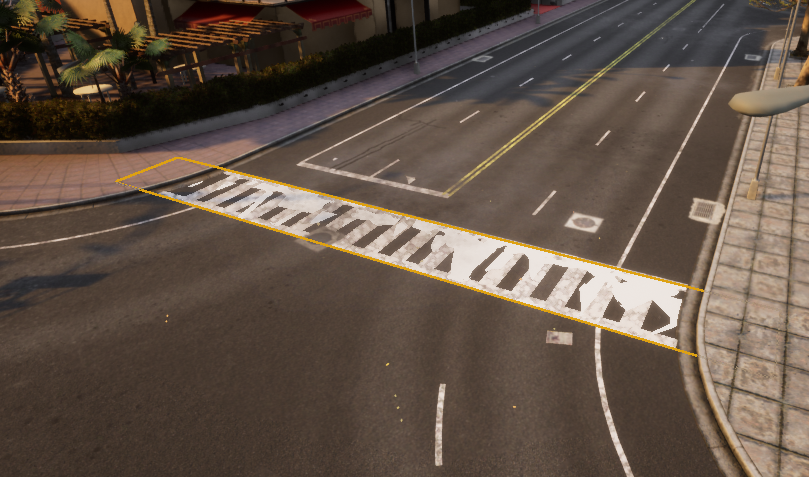
4. Name these planes following the common format Road_Crosswalk_mapname.
5. Press G to deselect everything, and export the map. File > Export CARLA....
6. Run RecastDemo ./RecastDemo.
- Select
Solo Meshfrom theSampleparameter's box. - Select the mapname.obj file from the
Input Meshparameter's box.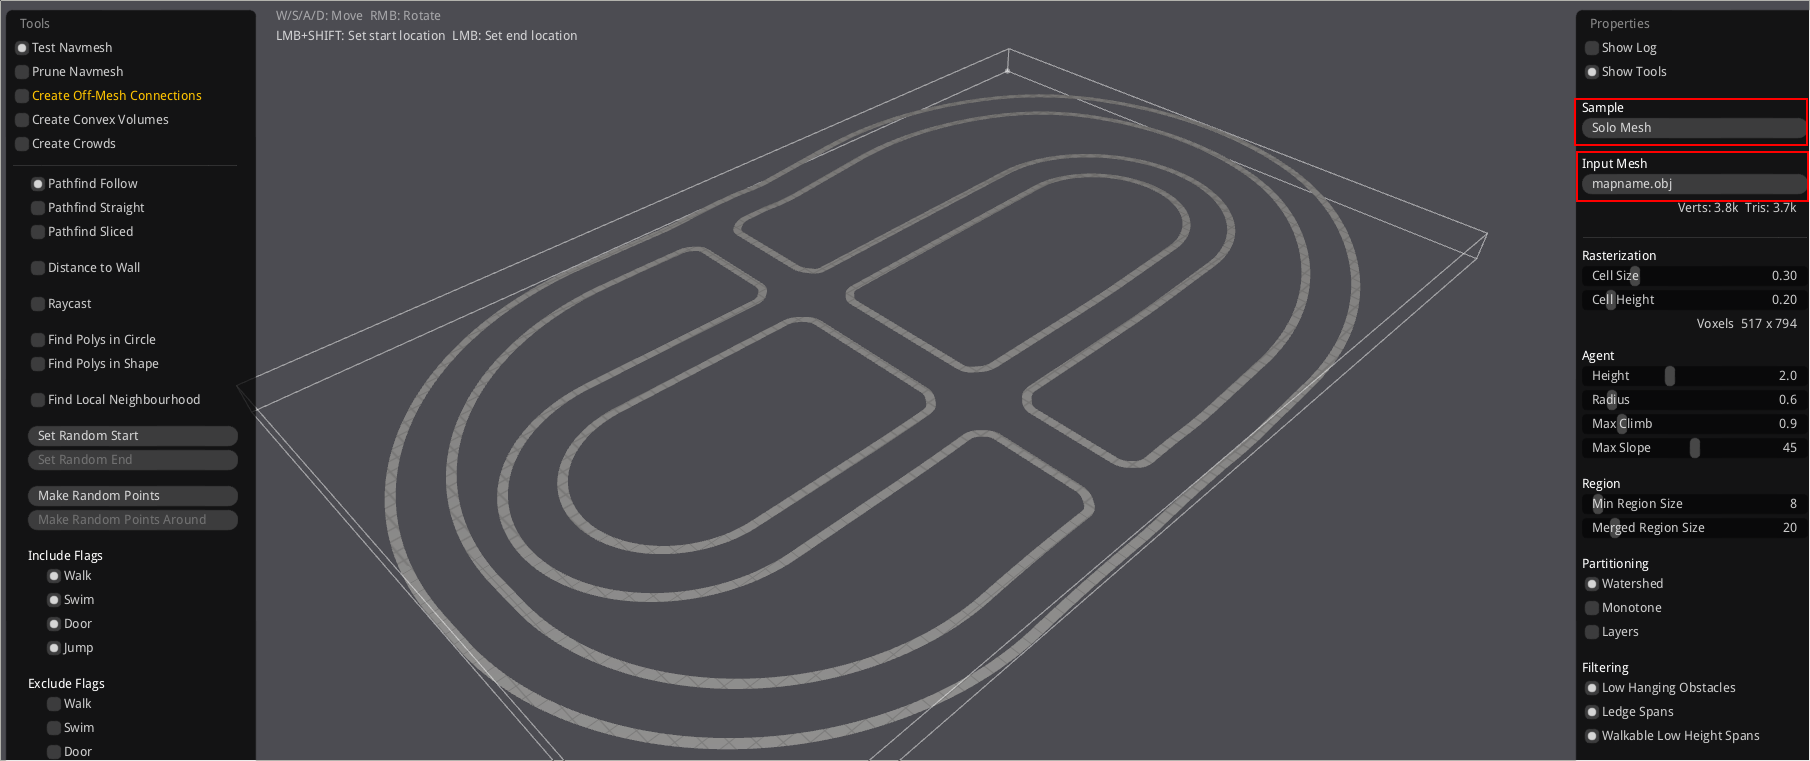
7. Click on the Build button.
8. Once the build has finished, click on the Save button.
9. Change the filename of the binary file generated at RecastDemo/Bin to mapname.bin.
10. Drag the mapname.bin file into the Nav folder under Content/Carla/Maps.